Last updated on June 3rd, 2021 at 04:46 pm
UniFi Security Gateway 3P and AT&T U-verse Pace 5268AC with block of static IP addresses
I have been an AT&T U-verse customer for my home Internet access for the past 30 months. For the first year I was using the standard package with a statically assigned dynamic public IP address (that simply means that even though AT&T did not assign me a static public IP address and my router’s WAN interface is configured for DHCP, it always receives the same address unless AT&T makes routing or other changes to their infrastructure). I have used that address in static and dynamic DNS records of privately held DNS domains without any issues and I use it almost daily to access my private network when I travel for work.
Standard configuration using AT&T U-verse equipment and my own private router
From the get-go I was using my own private router and firewall behind whatever equipment my ISP made me use. My reason for that is abstraction. I have changed ISPs a few times over the years for various reasons. Having my own router and internal network config has shielded everything south of my router from any changes a new ISP and their equipment causes. AT&T U-verse using the Pace 5268AC (Pace) has its very own way of handling “bridged mode”. I have used different routers over the years but finally settled on the UniFi Security Gateway (USG) 3P from Ubiquiti Networks. Once I figured out how to configure the Pace and the USG in tandem, I had the following configuration:
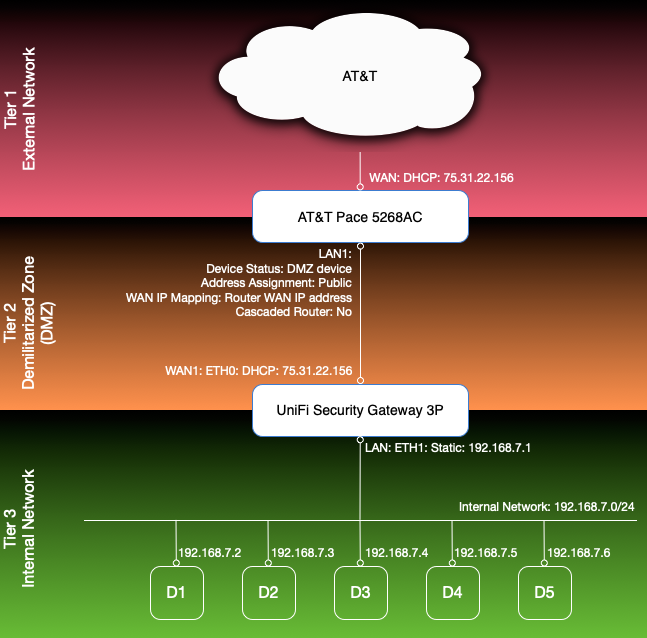
The Pace is configured for DHCP on its WAN interface and receives the statically assigned dynamic IP address. The USG’s WAN port is connected to one of the Pace’s LAN ports (LAN1) using DHCP. Once that is done, the Pace can be configured to use the USG as the DMZ device and to assign it the “Router WAN IP address”. That basically has the same effect as “bridged mode” in other devices by assigning the same IP address the Pace received on its WAN interface to the USG’s WAN port. So now all requests directed to the public IP land at the USG’s WAN port. With standard port mapping/forwarding rules I was then able to forward requests to different ports to different devices (D1-D5) connected to my internal network behind the USG. This is basically the same setup I had with previous ISPs and it works great within its limitations, which are that I can direct each port only to one internal device. So for example HTTPS requests to port 443 always go to the same box, the standard SSH port always reaches the same box (the devices receiving the HTTPS and SSH requests are not necessarily the same). That setup worked for me for years until I changed jobs and had the need to offer the same port/protocol from multiple devices in my internal network (e.g. I needed to allow standard HTTPS and SSH access to more than just one box at the same time).
Extending the standard configuration to include a block of static IP addresses from AT&T
So I reached out to AT&T and got myself a block of 8 static public IP addresses, of which 5 are freely assignable and 3 are taken up for networking (network address, router address, and broadcast address). That would give me the bandwidth I need and could easily be expanded by getting a larger block. My goal was to keep basically the same setup with an empty Demilitarized Zone (DMZ) and port mappings to devices and virtual machines running in my internal network. Hours of research and trial and error eventually got me to my desired final state:
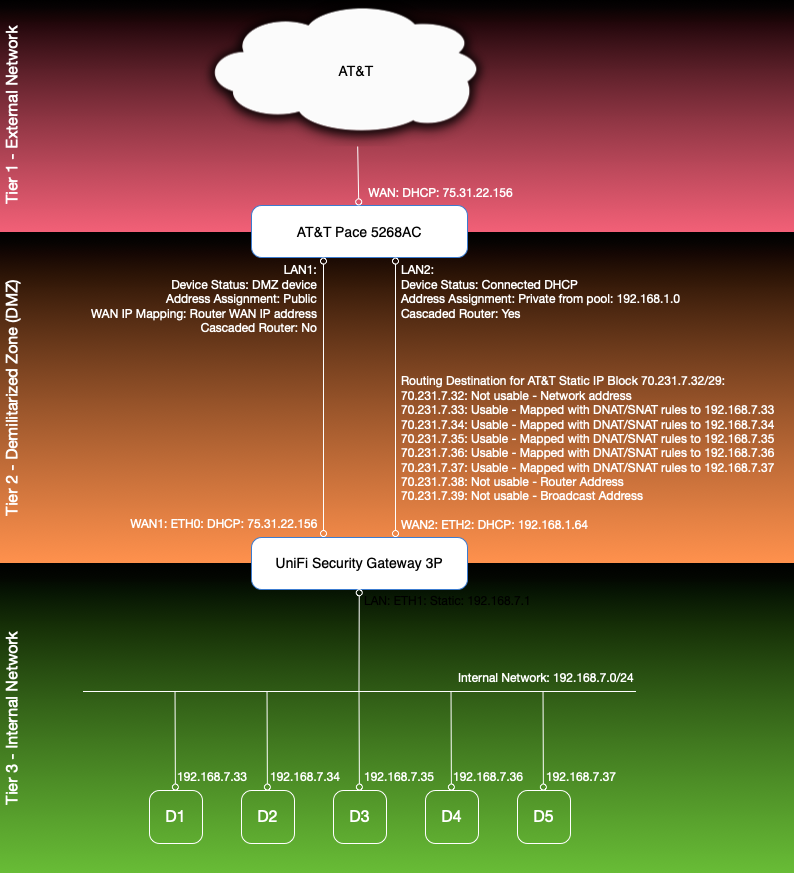
In this setup, none of AT&T’s static IP addresses are explicitly assigned to a network interface on any device, neither on the Pace, nor on the USG, nor on any of my other devices. The AT&T block simply serves as a public route into my network. There are two pieces of “magic” to make it work:
- The configuration of the block on the Pace
- The NAT rules and firewall rules on the USG
Initially I found promising posts from community members like this one Getting static IPs working with Uverse Pace modem and EdgeRouter-x, which guided me in the right direction but did not include the level of detail I needed for my skill level and familiarity with the devices I was dealing with plus it was written for an EdgeRouter while I have a USG. I still used the simple 8 step 8 line guide as a map through this jungle but it took much more research on each of the steps for me to be able to follow. I have documented exactly what it took to get my setup working:
Step-by-step configuration
1. Call AT&T and order your block of static IPs.
The block is active immediately. This was a relatively painless activity, except for the fact that I didn’t get anything in writing from AT&T to document my block. The very competent lady read the technical specs to me over the phone and told me they had taken away email and all other forms of communication so she couldn’t send me any messages to my account nor emails to my private address. There is also no place in the AT&T online portal to revisit what I’ve got, but when I started an online chat, the support team was able to look it up for me and rely it back to me and the chat transcript can then be emailed or copied and pasted. In the end, you should get the following information:
Block: 70.231.7.32/29
70.231.7.32 - Network with subnet mask: 255.255.255.248
70.231.7.33 - Usable 70.231.7.34 - Usable
70.231.7.35 - Usable 70.231.7.36 - Usable
70.231.7.37 - Usable 70.231.7.38 - Gateway
70.231.7.32 - Broadcast
The Primary DNS IP is 68.94.156.1 and secondary DNS IP is 68.94.157.1
That’s the critical information I needed to continue and that was all I got from AT&T.
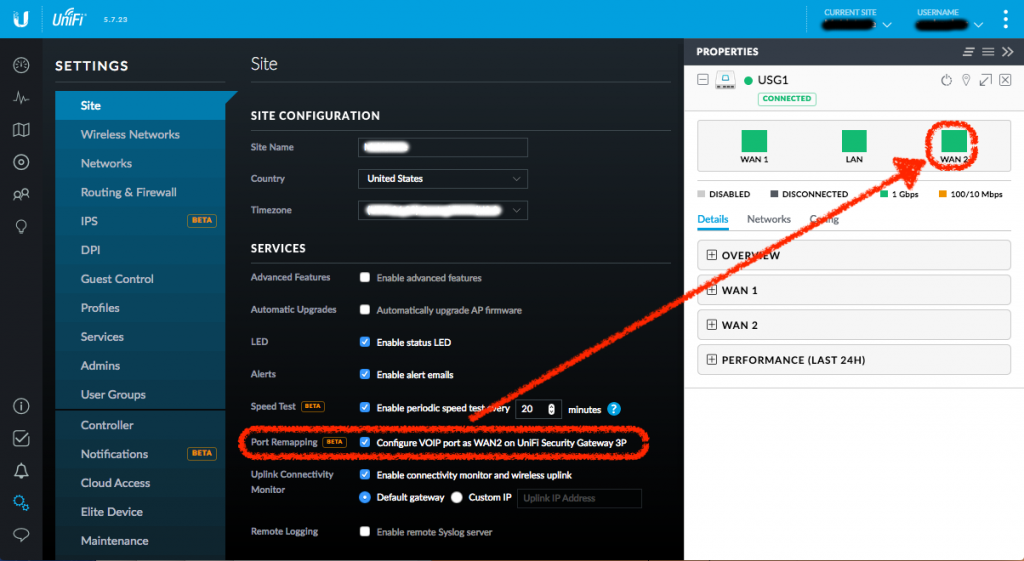
2. Configure VOIP port as WAN2 on UniFi Security Gateway 3P
This step is optional but I like what it buys me: The USG (at least my version of it) has 3 ports: WAN, LAN, and an inactive VOIP reserved for future use. In UniFi Controller v5.7.23 (maybe in earlier versions, too, but that’s the version I was running when going through this process) there is a site setting Configure VOIP port as WAN2 on UniFi Security Gateway 3P which enables the VOIP/LAN2 port as a second WAN port, giving me effectively WAN1, LAN, and WAN2.
I opted for this because it gives me an additional “static” address (the “statically assigned dynamic IP address” I’ve always had) and it allowed me to keep all my existing port mappings and firewall rules in place. At the same time it allowed me to experiment with a physically separate network interface while my family was streaming movies to 2 TVs and was using multiple connected devices without interruption. As a potential benefit I also get route fault-tolerance (if I add appropriate static routes).
Before I made the configuration change, I physically connected the USG’s WAN2 port (labeled WAN 2 / LAN 2) to one of the Pace’s LAN ports:
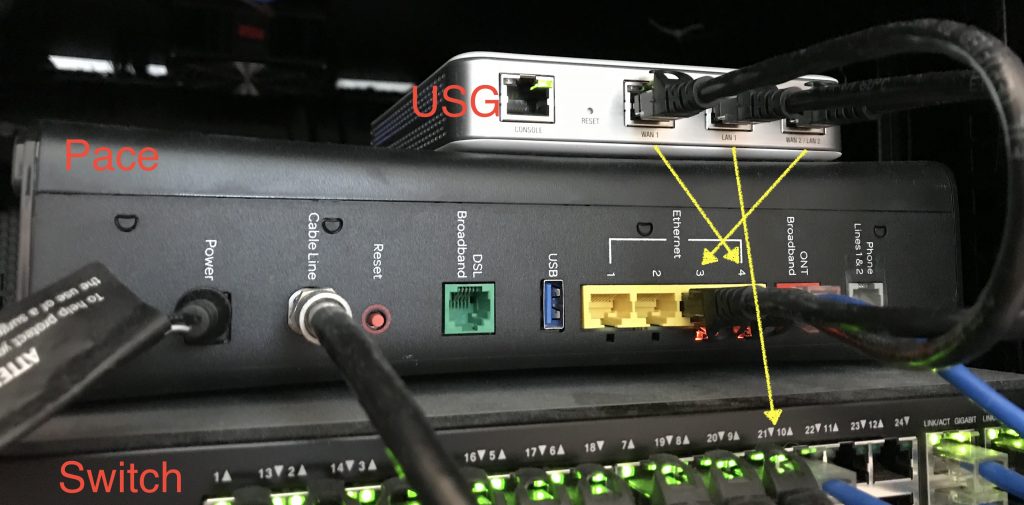
Then I logged into the UniFi Controller and navigated to Settings > Site and checked the checkbox next to Port Remapping (BETA) and selected Apply Changes. Once the changes are active, the USG device properties view should show an active and re-labeled WAN2 port:
By default WAN2 should come up configured with DHCP as it did for me. I then made sure the Load Balancing setting was “Failover only” in Devices > MyUSGDevice > Properties:
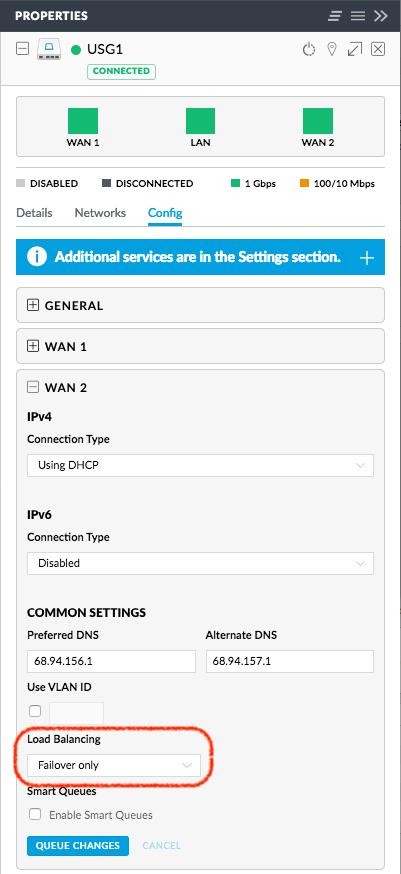
This last setting simply makes sure my routing works through the USG’s WAN1 interface and does not load-balance outgoing traffic through WAN2 unless WAN1 goes away.
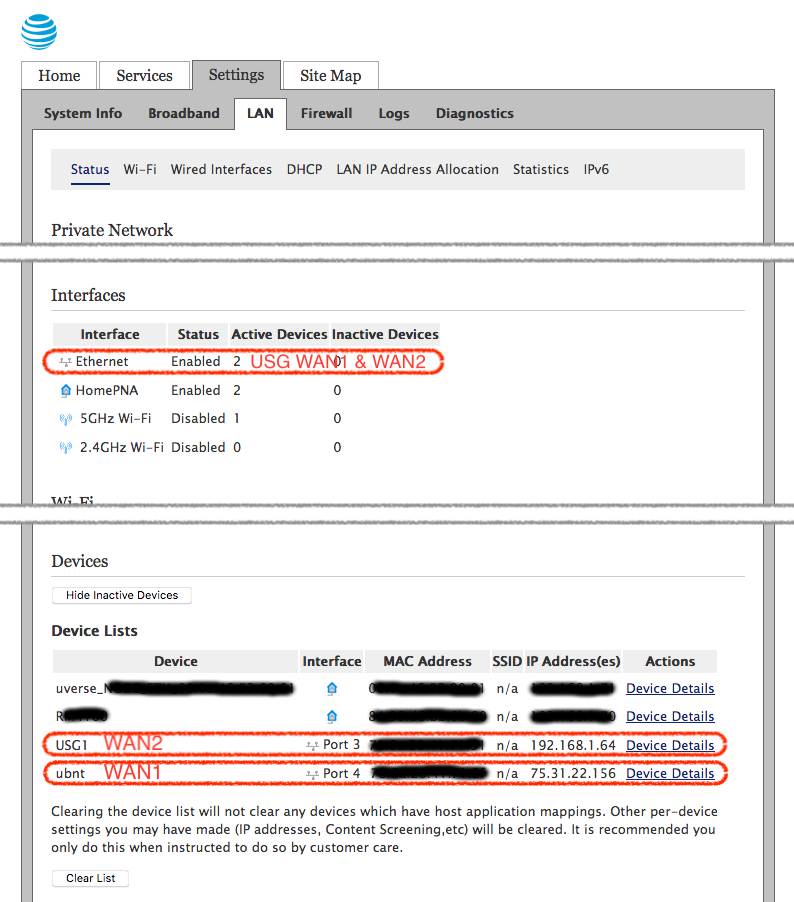
3. Validate Pace recognizes both USG WAN interfaces
To make sure my Pace recognized the new interface, I logged into its admin interface and navigated to the Settings > LAN > Status page. There I could see in the Interfaces section that the Pace now listed 2 devices connected to its Ethernet ports. Further down in the Devices section, I could see the USG’s WAN1 interface still listed with the statically assigned dynamic IP address like it’s always been and I could also see a new device, the USG’s WAN2 interface with a local DHCP address.
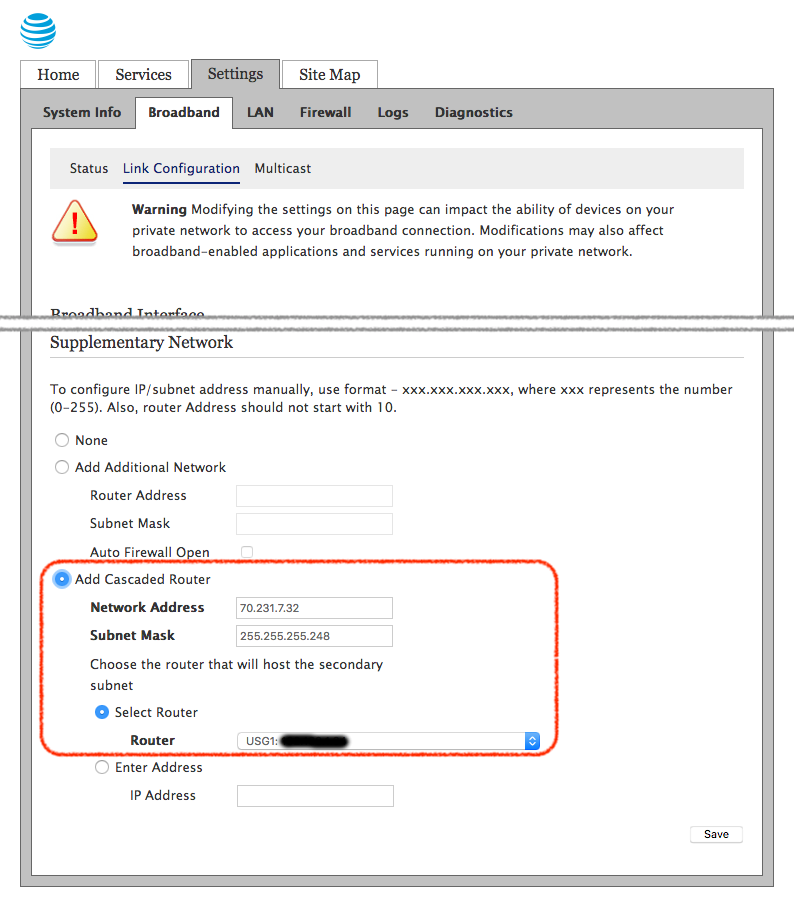
4. Configure the AT&T static IP address block on the Pace
Now that physical connectivity was established, I figured it was time to make the Pace aware of the block of static IP addresses it was expected to route properly. This step was painful because I was not able to locate any good documentation and guidance from AT&T on the matter. I quickly found out that the configuration had to happen in the Supplementary Network section on the Settings > Broadband > Link Configuration page in the Pace admin UI. There are three options in the Supplementary Network section:
- None
- Add Additional Network
- Add Cascaded Router
None is selected by default. To achieve the desired configuration, I selected Add Cascaded Router, configured the Network Address and Subnet Mask properties, and selected the USG WAN2 device from the Select Router list:
It took me a while to realize and fully understand what this setting really does. The Settings > LAN > LAN IP Address Allocation sheds some more light on what is configured now:
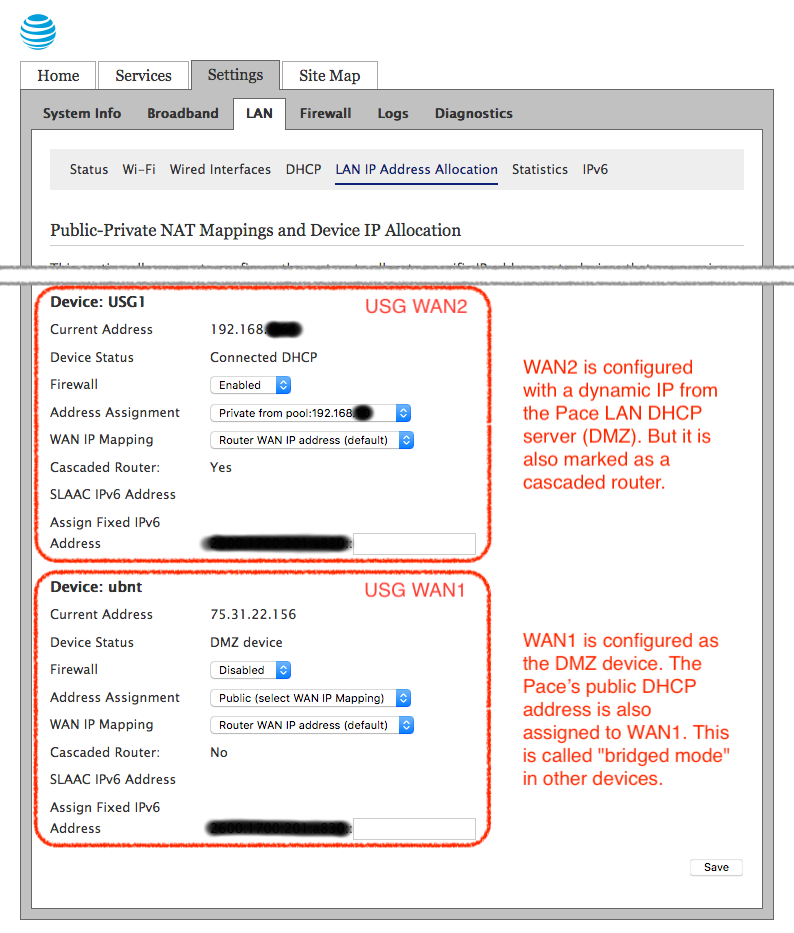
This confused me at first because I did not understand what was required on the receiving end of the Cascaded Router setting, on the USG side. It turns out that this configuration simply instructs the Pace to forward all packages addressed to any of the 5 usable IPs in the block of static IPs from AT&T to the USG’s WAN2 interface. That does not mean the USG WAN2 port has to have those IP addresses configured. The packets will physically be delivered to the interface no matter what. What to do with those packets is now up to the USG.
5. Configure NAT and firewall rules on the USG to forward traffic to internal hosts
At this point the network is configured to forward all traffic directed to any of the 5 usable public IP addresses to the USG’s WAN2 interface. It was this step that really had the community reeling from shock and unbelief during my research because the UniFi Controller does not support multiple WAN IPs nor NAT rules management through the UI and firewall rules management only for WAN1 and LAN ports:
That meant for me: Get familiar with the USG’s advanced configuration and troubleshooting options. I found these resources very valuable during my trial and error phase:
- UniFi – Advanced USG Configuration (for advanced USG configuration)
- SNATs and DNATs (for the basics on SNAT and DNAT)
- Intro to Networking – Network Address Translation (NAT) and the Internet (more on NAT from Ubiquiti)
- UniFi Security Gateway: Add an additional public IP with NAT (for NAT and firewall rules on the USG)
- USG Pro – Multiple WAN IPS mapped to various internal locations – How To Guide (this guide provided everything I needed for the NAT and firewall rules)
- UniFi – USG Port Forwarding Configuration and Troubleshooting (for troubleshooting of USG configuration)
Two things need to happen now to make the whole thing work:
- Packets addressed to the block must be re-addressed to internal IP addresses. This happens through Network Address Translation (NAT) rules.
- The firewall has to be instructed to allow traffic to those internal addresses.
On the USG, NAT rules are applied before firewall rules, hence the order. So on this step some of the articles I referenced above confused me and threw out red herrings that cost me a lot of time chasing down. It all came down to two simple rules per device/address and one rule to allow ICMP pings for testing and monitoring. In the end, this simple custom config JSON snippet in config.gateway.json closed the gap for me:
{
  "service": {
    "nat": {
      "rule": {
        "4033": {
          "description": "DNAT: 70.231.7.33 to 192.168.7.33",
          "log": "enable",
          "destination": {
            "address": "70.231.7.33"
           },
          "inbound-interface": "eth2",
          "inside-address": {
            "address": "192.168.7.33"
           },
          "protocol": "all",
          "type": "destination"
         }
      }
    }
  }
}
I applied my own numbering conventions here in order to better interpret debug logs and firewall statistics. I numbered the rules so they would be applied before default rules and rules defined in the UI and I decided to use the last digits of the IP address the rule governs as the identifier. So my custom NAT rules start at 4000 and then I just add the lats digits of the IP address, so e.g. 4033. NAT rules defined in the UI start at 6000. My custom firewall rules start at 1000, so 1033 to complete the previous example. I chose 2000 for the global “Allow ICMP” rule.
So for each public static IP address from the AT&T block I added a NAT rule to map it to an internal IP address. And to keep things simple, I used the same last digit on both public and internal IP addresses (70.231.7.33 maps to 192.168.7.33) thus the rule numbering works for both. The NAT rule alone will perform the necessary translation and port mapping but the firewall needs to be opened, too. So for each internal address that was NAT-ed I also added a firewall rule to allow SSH, HTTP, and HTTPS access from the outside.
Wrap-Up
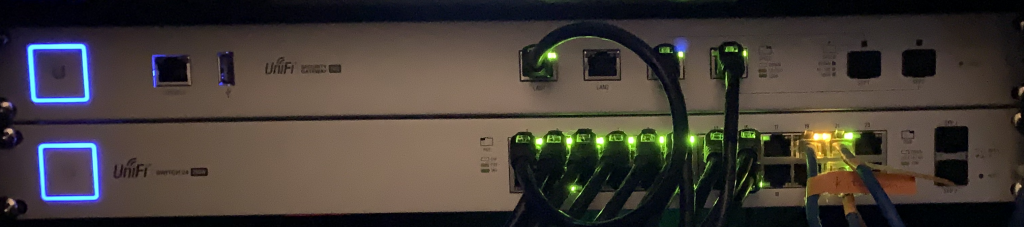
I have since made a few upgrades to my network hardware (namely I upgraded my USG 3P to a rack-mounted 4P and replaced my Cisco switch with a UniFi Switch) but at the core I am still running the same configuration and it has served me well.
As an IT professional and security specialist it surprised me how much effort it took to get this all understood and setup and working. However, I learn more by doing than any other activity and I prefer running my own infrastructure exactly for that learning benefit. It was all worth it and a lot of fun figuring it out.